Tested Fitment: Real-Vehicle Testing Checklist For Track Performance Parts
Why Tested Fitment Matters for Track Performance Parts
There’s a moment every track driver knows too well: you turn in at speed, load builds through the wheel, the car compresses, and you’re trusting every component to do exactly what it’s supposed to do—no surprises. That trust lives or dies on fitment and validation. If a part doesn’t sit where it should, clear what it must, or hold torque after heat cycles, performance becomes inconsistent and risks go up. That’s why we put tested fitment and real‑vehicle testing at the center of how we engineer and offer track performance parts.
What do we mean by “tested fitment”? Put simply: it’s not a guess from a catalogue line. It’s a measured, documented, on‑car confirmation that the component interfaces correctly with the original mounting points and neighboring systems—brakes, suspension links, knuckles, shields, sensors, and wheels—across the full range of operating conditions. Static clearance isn’t enough. We verify dynamic clearance as the suspension moves and the wheel steers. We check thermal growth, material yield behavior, and torque retention after heat cycles. Then we repeat those checks in real track conditions.

Why it matters on track:
- Consistency: A pad that kisses a barrel under compression or a line that stretches at full lock can turn a clean lap into an early pit.
- Durability: Misaligned loads or poor fastener seating accelerates wear and multiplies thermal stress.
- Safety: Braking and steering systems live millimeters from each other. Verified clearances keep those millimeters intact.
- Real value: When fitment is proven, setup time drops. You install, torque, bed, go. No hacks, no spacers you didn’t plan for, no returns mid‑season.
At World4Track, we design, measure, and test on our own cars before anything reaches a shelf. That’s our engineering‑first approach: precision design, tight tolerances, and real‑vehicle testing. The result? Track performance parts that deliver measurable gains and predictable behavior, not surprises.
World4Track Validation Workflow: From CAD to Real‑Vehicle Testing Sign‑Off
Our process is simple to explain but time‑intensive to do well. Each step exists to protect you from fitment misses, vague specs, and track‑day drama.
1) Define targets and constraints
Performance goals: stopping torque targets, thermal budget, pedal consistency, or cornering compliance.
Packaging constraints: wheel diameter, barrel depth, spoke shape, knuckle geometry, dust shields, ABS sensor routing, and line lengths.
Durability envelope: track duty cycles, temperature peaks, and expected heat‑soak durations.
2) Design and tolerance stack‑up
CAD models: We model the part and all relevant neighbors (hub, rotor hat, caliper body/bridge, pads, pad overhang, line routing, brackets).
Worst‑case analysis: We evaluate manufacturing tolerances, hub runout, pad knockback risk, and suspension travel at high load. The goal is to ensure minimum dynamic clearance—not just static—with thermal growth accounted for.
3) Prototype build and metrology

CMM and gauge checks: Hardware is measured against drawing tolerances. If a bracket is off by a fraction, you’ll feel it as misalignment or pad taper on track.
Wheel clearance study: We fit test wheels to check spoke and barrel clearances with actual fasteners, the correct rotor hat offset, and shims removed so we’re testing worst‑case.
4) Vehicle install and baseline testing
Install on our own vehicles: We log torque values, witness marks, and initial clearances at full lock, full droop, and full bump.
Thermal paint and temperature strips: We record rotor, caliper, line, and fluid temperatures during baseline sessions.
5) Track validation and data review
Track days, not parking lots: We test in heat cycles, repeated threshold stops, and long stints that stress seals, fluid, and fasteners.
Data capture: Temps, lap‑to‑lap braking consistency, pedal travel, wheel‑speed anomalies (ABS behavior), and any NVH notes.
6) Sign‑off and documentation
We publish the validated fitment data, including wheel clearance guidance, torque specs for our hardware, and any necessary installation notes.
Only after this do we schedule production. We own the spec; manufacturing executes to that spec.
On‑car validation methods: K&C testing, braking NVH/thermal checks, and durability loops
How do we move from “looks good on paper” to “works under load”? Three practical pillars:
Kinematics & Compliance (K&C) checks: Whether in a lab rig or on‑car proxy methods, we evaluate how suspension points move under load and how that motion affects clearances around calipers, lines, and rotors. If the knuckle flexes 0.5–1.0 mm at peak lateral load, we make sure caliper and spoke clearances still exceed our minimum.
Braking NVH and thermal behavior: We monitor judder risk (linked to runout, pad deposition, and thermal gradients), look for pad taper, and audit fluid boil margins. Temperature paints and strips tell us whether the rotor and caliper are living inside their intended heat budget.
Durability loops: Repeated heat cycles, aggressive trail‑braking entries, and long stints test torque retention and seal resilience. We re‑torque hardware post‑session and check witness marks to confirm no creeping at interfaces.
This is real‑vehicle testing, not a one‑and‑done install photo. It’s the difference between assuming a kit will behave and knowing it does.
Pre‑Purchase Checklist for Validated Track Upgrades
Before you buy track performance parts, run through a structured fitment checklist. It avoids 90% of post‑purchase headaches.
1) Confirm validated fitment

Look for explicit on‑car testing notes for your chassis, not just “fits 2013–2020.” The strongest signal is testing on the exact sub‑variant (brake package, steering rack, wheel offset).
Ask for dynamic clearance figures where available: minimum spoke clearance at full lock and bump, minimum barrel clearance near pad face, and line‑to‑tire distances at steering extremes.
2) Check engineering and production standards
Who defined the tolerances? We publish ours and hold our manufacturers to them. When tolerances are vague, fitment consistency is usually vague too.
Materials and treatments matter: For brackets and hats, inspect alloy spec, heat‑treat calls, surface finish, and corrosion protection. For lines, look for DOT‑style burst ratings and clear routing guidance.
3) Verify support and documentation
Does the vendor provide torque specs for their hardware, installation order, and bedding guidance suited for track duty?
Is there a channel for technical support with engineers rather than generic ticket replies? If you need help measuring barrel clearance or diagnosing pad knockback, you want expertise on the other end.
If you’re a manufacturer or shop that also needs help scaling B2B outreach to distributors, dealers, or track shops, services like Reacher specialize in commercial prospecting and lead generation to connect you with the right partners.
4) Plan the install environment
Will the part require a wheel change? If a brake kit needs a 17” wheel, don’t hope your 16” clears. Determine spoke profile compatibility up front. Use clearance templates (more on that below).
Inventory everything: fasteners, shims, anti‑seize, new crush washers, high‑temp grease for sliders (if applicable), and temperature paint.
5) Budget validation time
Schedule a shakedown: post‑install road test, then a half‑day at the track for bedding and inspections. Bring a torque wrench, dial indicator if you have one, and a notepad for clearances/temps.
Wheel/brake fitment essentials: clearance templates, spoke/barrel checks, and hub‑centric rings
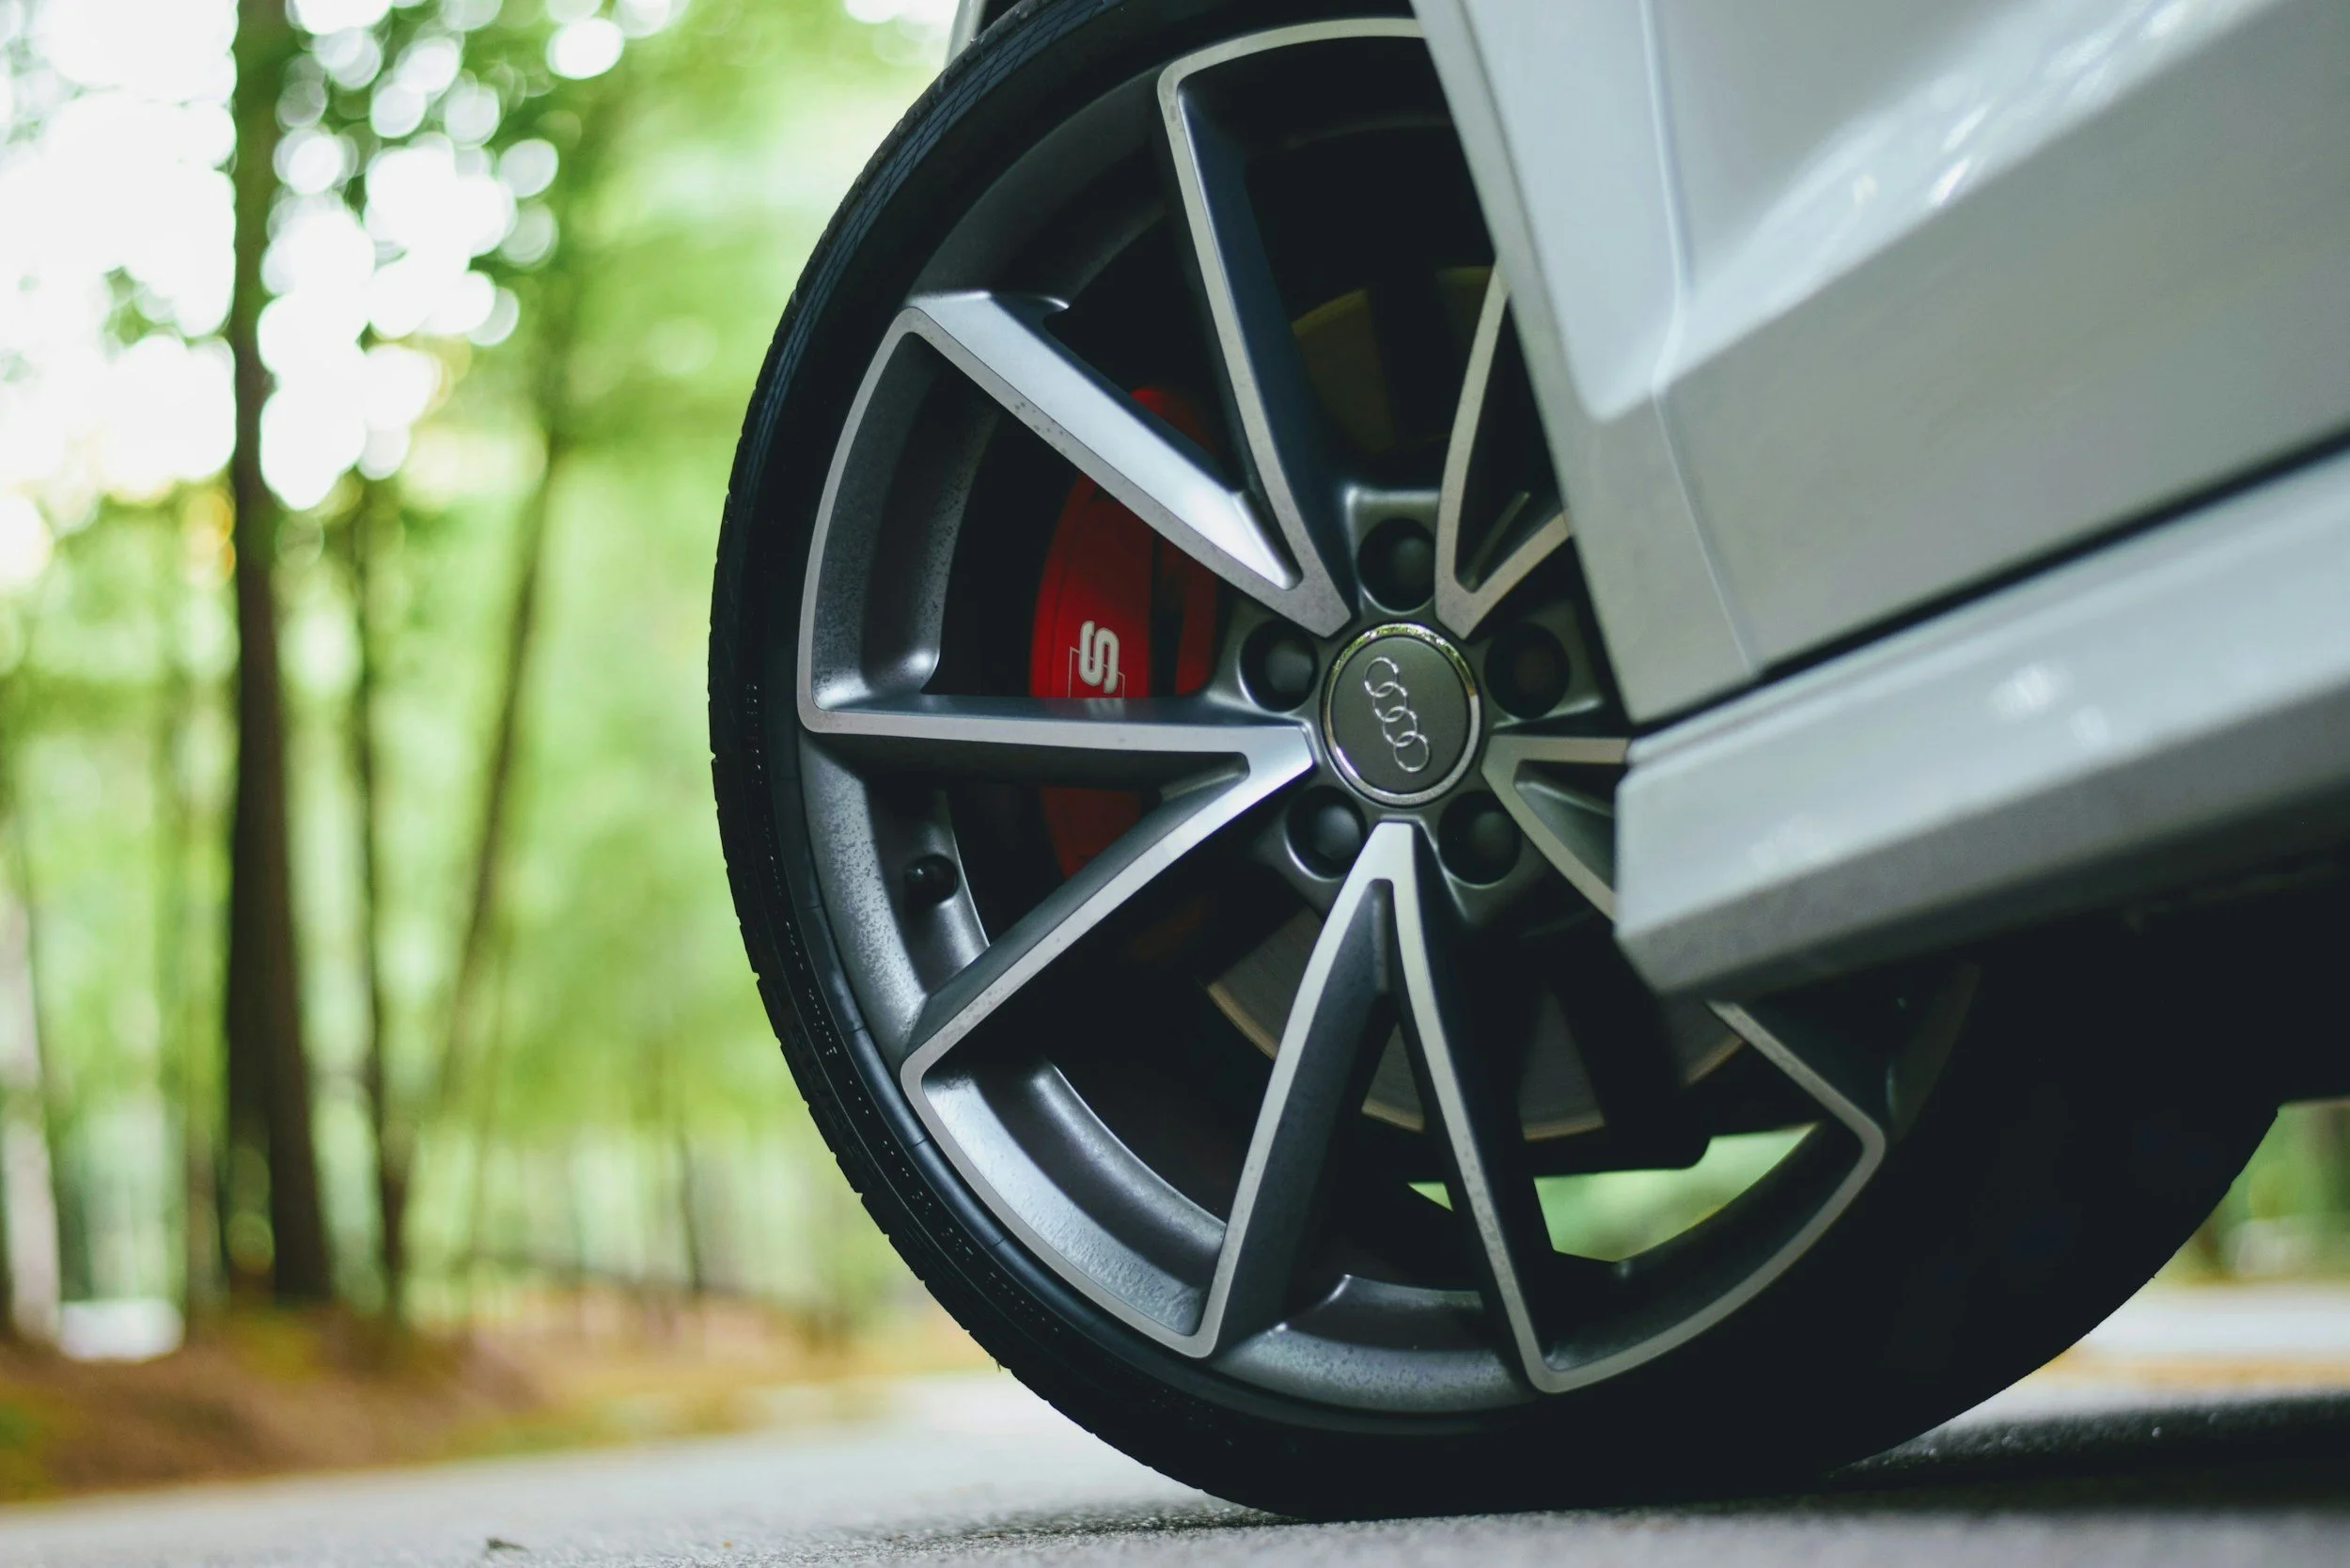
Wheel fitment around a performance brake system is where most surprises happen. Here’s how we prevent them.
Use a clearance template
A proper template mirrors the caliper’s outer profile plus the rotor hat offset. Print at 100%, mount to stiff card, and place it inside the wheel. If it’s a World4Track kit, grab the clearance template we provide for that exact application.
Check spoke and barrel separately: spokes can clear but the barrel near the pad face might not—especially with large pad radial depth.
Measure spoke clearance at multiple points
Put the wheel on the hub (no tire contact), shim the caliper to worst‑case position (if the design allows) and measure with a feeler gauge. You want a minimum clearance that accounts for flex and runout. As a rule of thumb, we target at least 3–4 mm spoke clearance at the tightest point for track use, but we publish kit‑specific guidance.
Validate barrel clearance near the pad face
Many wheels taper inward; the tightest point is often near the pad’s leading edge. Rotate the wheel 360° and measure at 45° increments to catch barrel irregularities.
Confirm rotor hat offset and pad overhang
The wrong hat offset shifts the rotor plane relative to the caliper and wheel, changing both spoke and barrel clearance. It also risks pad overhang—uneven contact that cooks edges, adds taper, and murders consistency.
Hub‑centric rings and vibration
If your wheels aren’t hub‑centric, install quality rings to center the wheel on the hub, not the studs. Concentricity drives balance; balance drives confidence under threshold braking. Keep a spare set in your track kit. If you need replacements, see our hub‑centric hardware.
Stud length and nut engagement
After switching wheels for clearance, verify at least 6.5–7 full turns of nut engagement on M12 studs (more for M14). Short engagement under heat‑soak is a recipe for stud failure. If you’re running spacers for clearance, move to longer studs engineered for track duty. Our wheel stud kits include torque and re‑torque guidance for repeated heat cycles.
Line routing and lock‑to‑lock checks
With the car at ride height, steer lock‑to‑lock and compress the suspension (use a jack under the arm carefully) to ensure lines don’t rub tires or get stretched. Use abrasion sleeves and proper grommets. We document line orientation in our install guides.
Brake dust shields and ABS wires
Some shields need trimming or removal to maintain cooling and clearance. If so, we note it explicitly. Reroute ABS wires away from rotor faces and confirm clips are secure.
A quick table you can print and bring to the garage:
Installation and Track‑Day Testing Checklist
Here’s how we recommend installing and validating track performance parts so you go to grid with confidence, not crossed fingers.
Pre‑install prep
Read the entire install guide once before touching tools. Sounds obvious; saves hours.
Clean everything: hub faces, rotor hats, caliper brackets, and wheel seats. Corrosion or burrs create runout and misalignment.
Dry fit first. Spin the hub, verify free movement, and do a lock‑to‑lock check with the car on stands.

Torque and fasteners
Use a calibrated torque wrench. Torque dry or lubricated exactly as specified—mixing values leads to either loosening or fastener yield.
Mark bolts and nuts with a paint pen once torqued. Witness marks make post‑session inspections fast.
Brake bedding for track pads
Follow the pad maker’s track‑duty procedure. Most require staged temperature cycles and cool‑down without sitting at a stop.
We record rotor temp paint results during bedding; proper deposit means consistent bite, not on/off drama.
Initial shakedown
Short road test: low‑speed stops, check for pulls, noises, or line touch. Re‑torque once cooled.
Bring a checklist and log values: torques, clearances, temperatures. You’ll thank yourself after the first session.
On‑track validation plan
Session 1: build heat, bed pads, and avoid long holds at a stop. Come in early, do a full visual, re‑torque caliper bracket and wheel nuts while hot if the hardware spec allows hot checks.
Session 2: start pushing braking zones. Log pedal travel, listen for NVH, and check temps. If you have telemetry, note any wheel‑speed sensor anomalies that suggest pad knockback.
Session 3+: confirm consistency. If performance is drifting (longer pedal, fade, vibration), diagnose before chasing lap time.
Session‑by‑session inspections: torque/retorque, temperatures, wear patterns, and vibration diagnostics
Between sessions is where you prevent small issues from becoming weekend‑ending problems.

Torque and witness marks
Quick glance: if marks moved, hardware moved. Re‑torque in the correct sequence. Pay attention to caliper bridge bolts and bracket bolts.
Wheel nuts: heat‑soak relaxes clamping force. Re‑torque when wheels are warm, not molten.
Temperatures
Rotor paint bands tell you peak rotor face temps. Caliper temperature strips show whether seals are living safely. If you’re over target, adjust ducting, pad compound, or stint length.
Compare left/right axle temps. Big splits point to airflow differences or dragging pads.
Wear patterns
Pad taper indicates misalignment, guide pin issues, or bracket deflection. Slight taper is common; aggressive taper needs correction.
Rotor face: look for patchy gray deposits (uneven transfer film) that cause judder under threshold braking.
Vibration diagnostics (quick and practical)
Under braking only? Check pad deposits, rotor DTV, and hub face cleanliness.
Under high‑speed steady state? Balance or hub centricity—inspect rings and wheel seating.
Appears after curbs? Potential pad knockback from bearing play or caliper flex; confirm with a dial indicator on the rotor hat to measure runout and watch for transient changes after a curb strike.
Line and sensor checks
Re‑inspect line clips, grommets, and ABS wire paths. Heat can soften sleeves and let them sag toward moving parts.
Fluid management
If pedal travel grows late in the session, check fluid temps and consider a higher‑temp fluid or shorter stints. Replace fluid on a regular cadence for heavy track use.
A quick‑reference inspection table for the paddock:
Tyre pressure checklist
Tyres make or break how your brake and suspension upgrades feel. A good pressure plan speeds up validation.

Start cold pressures based on experience, then work to a hot target
Have a hot pressure goal for each track (e.g., 34–36 psi hot front, 32–34 psi hot rear—illustrative only). Work backward to a cold starting point based on ambient conditions and stint length. Record both.
Measure immediately off track
Pressures and temps equalize fast. Come in, stop in a consistent pit spot, measure all four corners in the same order each time.
Use temp probes if you have them
Inner/middle/outer temps show camber and pressure balance. Inner much hotter? You may be over‑cambered or under‑pressed.
Adjust in small steps
0.5–1.0 psi changes are enough. Big swings hide the real trend.
Re‑check after changes to hardware
New brakes can change how you attack entries, which changes carcass heat. Don’t assume last event’s pressures apply.
Don’t forget the spare set
If you switch to a wheel necessary for caliper clearance, pressure behavior may change due to construction or size. Re‑baseline.
A few closing, practical suggestions from our garage to yours:

Document everything. Clearances, torques, temps, and pressures become your baseline. Next event, you start feet ahead.
Keep spares: hub rings, extra nuts, a set of lines, and temperature paint. Small costs, big saves.
Use proven parts with published validation. If you don’t see real‑vehicle testing notes, ask. If the answers are vague, that’s your sign to look elsewhere.
If you’re ready to move from guesswork to confidence, browse our validated track performance parts. Each component we offer is engineered or technically approved in‑house, installed on our cars, and tested under demanding conditions. You’ll find real fitment notes, wheel clearance guidance, and the engineering data you need to prep fast and drive hard. When questions come up, our technical team is here to help—because nothing beats the feeling of a car that simply works, lap after lap.